Sunday 22 November 2015

Mini Album: Using Sequins and Confetti

These pictures are of a mini album that I made as a present for my best friends 30th Birthday. We have been friends since primary school, I entitled the mini album '30 Years of Friendship (well, almost....)' She was absolutely thrilled with it and it gave me an opportunity to trial a load of different techniques. I had recently invested in the Fuse Tool so I knew I wanted to get some use out of that!
 

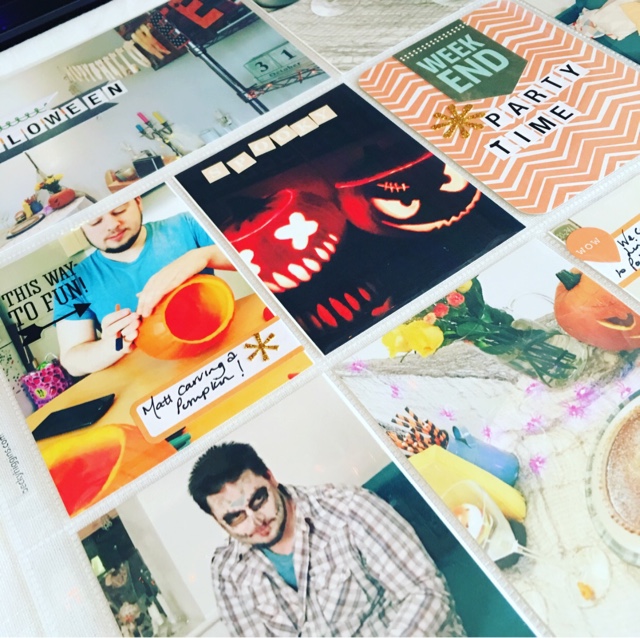
With the page above I added some red star confetti to the picture of the two of us dressed up as witches, I really liked this effect of just chucking the confetti straight in with the picture, it looked cute and added some fun interest to the page. and you'll see I also did in on the picture below but there I used some sequins from a Dovecraft sequin pack. I used quite a lot of sequins in the following pages.


The layout below is from my friends Hen Do, I got over excited with my circle punch and I loved the look of it, the pictures kept moving around in the pockets though which was driving me crazy so I used my Fuse tool around the outside to keep them in place. After I'd done it I decided to add a few sequins around the outside, I picked out the colours that worked with the spread and I had a lot of fun with it if I did it again I'd add some sequins under the picture before I fused it because often the sequins didn't fit past the picture so I was only able to stick a couple in to it.
 
 
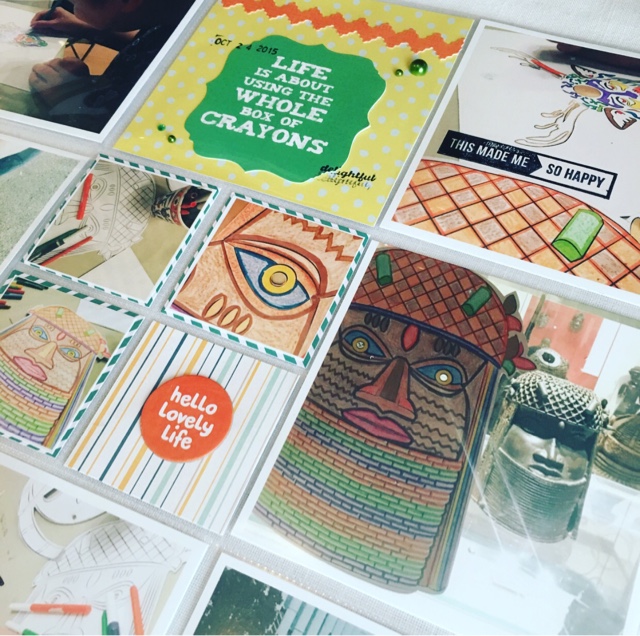
I have seen lots of people on blogs and YouTube add the cool corner pockets on 2x2 layouts and I really wanted to have a go. I much preferred the 1/2 pockets with the paper in the bottom than full 2x2 squares with confetti or sequins in.


I had a lot of fun with this album, I highly recommend completing a mini album just for the fun and the opportunity to trial some new techniques for your scrapbooking. I have a couple more posts related to specific pages of the album followed by a walk-though video in a couple of days time.


Saturday 21 November 2015

Project Life 2015: Works Party

Hey everyone, these are some snapshots from my most recent process video, this documents a works party that I had with some collegues. All the pictures from the night were taken on my mini instax camera. It was great fun to use with all my friends and I gave loads of the film away. Before I gave them out to various people I used my phone to take some pictures of the instax prints so that I could include them in my project life album!
 
 
There were 3 cards that I had already done and finished before I even started the spread! The bottom three cards were already complete where I had tried to start the spread on a different day but just hadn't been feeling it! (sometimes that happens to me, hate those days when I lack inspiration!)


This spread has lots of little details on it like the addition of strips of washi tape and the die cut tag stamped with 'today' I had lots of fun creating this layout.
 
 
I did a full PL cards worth of journaling, I could count the number of times I've done that on my hand! So I'm pretty chuffed that I'll have more to help me remember the day in a few years time. :)


I included some of the original instax photos in this album too. I don't like to put too many in to one spread as I feel I have to use journaling cards to mount the pictures and it ends up way too busy for me!!

If you want to see my process watch the video on my YouTube channel link below:


Wednesday 18 November 2015

Project Life 2015: Hadleigh Castle

This post is of a spread i did using pictures from a walk up to Hadleigh Castle. I love a good wander to clear my head on a Sunday, and as the wind was very brisk this weekend a walk definitely had the desired effect!

This is a fairly simple layout so I've kept my chit chat to a minimum! :) 


I used a printable sticker set I found on the Internet, bought some sticker paper off amazon and then cut some of the stickers apart for this spread. I'd really recommend doing this as it was cheaper and there are some nice sets available. I plan on doing a detailed post on this in a few weeks once I've found some more printable sticker sets! 


I managed to use up some stickers from some of my simple stories sets including this black and clear washi strip which I think looks really cool on this picture as it works with my zebra scarf! 


I matted the 2x2 pics on some paper from a 'falling leaves' paper pad I picked a russet coloured paper that drew from the table cloth in the picture above. 


I decided to outline the simple stories stickers from the I Am collection that said 'on my way' to really make them stand out from the backing paper. I was fairly pleased with the look that gave. 

See my YouTube video below for more details: 
 

Saturday 14 November 2015

12x12 Layout: Meeting Thea

 
Hello! Today's layout is a pretty 12x12 page for my project life album. This is the only picture that was taken the day I met my best friends baby Thea. I always use 12x12 spreads to document either my favourite pictures or the occasions when I was at some kind of event or important day where only one photo was taken. 


I used this pretty 12x12 paper from the kaleidoscope pad. It had flashes of pink, purple and teal on it. I absolutely adore the paper in this particular pad. I was also given the cute faun paper from a friend and the teal in that banner really brought out the teal in the background. I felt that all those colours together really pulled on the tones in the picture so I was pretty pleased with the outcome. I used a Becky Higgins project life card from the Fine and Dandy collection to write my journaling on, this is the kind of life event that I thought was worth a few words. The little butterfly is from the Kaiser Craft all that glitters set.


I used some off cuts of paper to die cut a selection of flowers from a sizzix set of die cutters. I decided not to layer them as such but to use them in a row along the base of the picture to add interest. Getting them out of the cutters was such a pain! I was pleased with the finished look (thank goodness, as it took about 35 mins just to get them out!!) I used some sequins to embellish the flowers and also above the photo to add interest, the 'delightful' is from my Amy Tangerine roller phrase stamp, I have now ordered another roller phrase stamp, as I tend to use this one in EVERY spread. The little arrow paperclip is from The Range it came in a set of paperclips for 50p I'd recommend checking out their stationary section as they actually had loads of different shaped paper clips that could be useful for scrapbooking.


Check out my process video below:


Wednesday 11 November 2015

Project Life 2015: Sugar Hut

 
Heeeeeellloooooo! Today's spread is a Project Life spread from a trip I took to Sugar hut. I went down an incredibly sparkley route with this particular spread and used lots of die cuts from the 'all that glitters' Kaiser Craft pack of dies!


My title page is made from a Becky Higgins 4x6 card from the fine and dandy collection which I cut down to 4x4, I then used a set of Aqua Glitter Thickers to spell out 'Sugar Hut' before adding a roller date stamp and some journaling. I think the journaling added some texture to that page and breaks away from the glitter overload that was going on with that card!


Again, my favourite label stickers came out. This sticker set was from Amazon its a labelling set for folders but I love using them to add more journaling to my spread. I also used a my Sizzix to die cut the word 'friend' this is from the sizzix die cut set 'friend' which comes with 16 word die cuts that are so versatile! I absolutely love this die cut set.


The 'leave a little sparkle wherever you go' is my favourite card in the spread, my dress was super sparkly (hence the theme) so this die cut from the 'all that glitters' range was perfect, I just added a flash of pink polka dot washi tape and some pretty sequins to finish off the page!


If you want to know more about how I did this layout have a look at my YouTube video:


Sunday 8 November 2015

Project Life 2015: The Big Draw

This is one of my favourite spreads in a while, I love the colours and the way it all came together. This was from a trip to the British Museum where we took part in the #bigdraw we got involved by colouring in some masks in the Africa room, I picked the drawing of Head of an Oba, these are made out of brass and placed on the shrines of dead kings alongside ivory and other wooden and metal objects. I love the Africa section. My colouring was little more vibrant than the original as you can see from the pictures!


I found this die cut from my KaiserCraft Fiesta pack and couldn't believe how perfect it was for the day! 'Life is about using the whole box of crayons' and I EVEN USED CRAYONS! it was as if it were made for the spread!


I used this as the perfect excuse to get my sizzix out, I love these dies from the friends range it comes with 16 dies with various words and phrases including 'truth, friend, everyday, wonderful, hope, hello' and many many more! I find reason to use them in so many spreads they were such a good buy!


I added some journaling to this spread (in fact a little more than I normally do) I used the 4x4 card, a sticky label and a die cut shaped like a speech bubble to include some journaling of things I loved from the day.


I love this particular layout, these pocket pages are from We R Memory Keepers it's perfect for instagram pictures and the 4 2x2 pockets mean you can get even more pictures on to your page. Next step for these pocket pages is to work on shaker and see-through pockets (although I'm not confident I'll be able to pull these off!)

 
See my YouTube video below (It has a voice over on it!!! Took ages to work out how to do it effectively, so I'm pretty chuffed. Check it out and subscribe to my channel.)


Saturday 7 November 2015

Project Life 2015: Halloween

Here is a 2015 Project Life spread of my Halloween celebrations. I love the collection of pictures I took here and this spread was a fun one to put together. I took lots of pictures of elements of the day which is a new approach for me, my spreads normally contain lots of pictures of people, but it's fun to document the little things too like the decorations, pumpkins, our yummy midnight margaritas and my very first attempt at Pumpkin Pie (which was delicious by the way!)


I printed off all of my pictures, I use the beautiful mess app to get them in the 3x4 format, its easy for me to do with my phone and send it straight from there to my wireless printer! This way I could use lots of instagram photos too! I love the top left hand 4x6 photo I managed to get the date in too.


You'll see three of the folder label stickers which I used for journaling in this spread. I got the set pretty cheap off Amazon, I was so chuffed with this find! As you'll be able to see from the YouTube video this pack came with lots of different colours and there are hundreds of labels, this little set should do me for quite a while!!


The filler card is made from a Becky Higgins Project Life card, I'm afraid I have no idea which kit! I used this cute 'Week End' sticker as Halloween this year fell on a Saturday and I love these white letter stickers that I'd got off eBay - nearly run out now, definitely need to get some more of those!
 
I added lots of stickers to the layout and all of them are by Simple Stories, the tiny word sticker, and the black clear photo sticker that says 'this way to fun' as well as the small orange sticker and the grey one in the top right hand corner. I always find these sets so versatile and use them in almost every spread I do!


This final picture shows my 12x12 layout next to the standard Project Life spread (which you can view here) , I love the way they look next to each other, so pleased with the final look of this spread! Yay!

To see what I used watch the YouTube video below, don't forget to subscribe to my channel! :)


Friday 6 November 2015

Scrapbook 12x12 Layout: Merry Go Round

A very bright layout showing a picture of my friend and I on a merry go round in Cornwall! This was one of my 1st 12x12 layouts and although it's ok, it isn't one of my favourites: 


Some things I like about the spread include the cluster of embellishments by the picture of us on the merry go round they include some simple stories stickers a die cut and wood veneer camera from studio calico. 
 

I was pleased with the thickers spelling out 'friends' it fitted the theme and really stood out on the coloured background, the wooden star buttons added lots of colour and interest (I got them from eBay, an inexpensive find) 


I liked the general idea for the journaling but I think it's too regimented the way it's level with the picture and might have be fitted from being smaller and hand written on to the spread, the washi tape was a bit of a test and perhaps in hindsight the green is too greater contrast, it really stands out and is a bit jarring!


Overall there are definitely things I would change about this layout, but that's the good thing about scrapbooking - every spread is a learning curve! 

To see the process watch my YouTube video: 


Monday 2 November 2015

Scrapbook 12x12 Layout: Halloween 2015

 
This 12x12 layout is a follow on from yesterdays post, here I'm creating my own background to display a spooooky Halloween picture of me and my friends.


I made the background using a white candle, I rubbed the wax across the page drawing star shapes. I sprayed the gold spritzing ink over the top as the wax is water proof it meant I could wipe off the excess ink over the stars so you could see the shapes below the spray.


I used some black thickers, some gold letter stickers and an Ampasand to make my title for this spread 'Halloween & Friends'


I used a selection of black, orange, and patterned papers to back my photo and picked out similar coloured stickers and chipboard pieces to embellish the page with.


I also fiddled around cutting out lots of cute stars using my star punch from Tiger, I cut out from Gold glitter paper and the orange cardstock that I had used to back my pictures.

I was pretty pleased with the finished look, can't wait to have another go at a wax and ink background, got a blue spray just waiting for it's debut!

If you want to see how I did it check out my video (it's my first attempt at a voiceover, could use a little work so bare with)


Sunday 1 November 2015

Tutorial: Floral Headbands (Happy Halloween)

Hey guys, I hope you had a brilliant Halloween filled with ghoulish madness! Mine was 'wicked' I enjoyed the company of a big group of friends, midnight margaritas, pumpkin pie, pumpkin carving, chilli and facepaint for my Halloween / day of the dead party.

I thought I'd show you some pictures from the event and how I created the floral headbands, this post will also be followed with 2 scrapbooking spreads over the next few days including a project life spread and a 12x12 layout. 


I started off by preparing the food and decorating up my flat. Kept it pretty simple with a few pieces of stretchy netting to resemble a spiders web, little spider lights and the pumpkins that my brother and I carved also sprinkled about some pumpkin confetti. 


Once everyone arrived we got on to the face painting and made ourselves look like sugar skulls with a whole load of white paint and brightly coloured eyeshadow. I had pre made these cute floral headbands for us to wear, they are super cute and super easy to make: 


1. take 2 sheets of brightly coloured tissue paper, fold them in half, cut them down the centre and layer them on top of one another so you have 4 sheets
 
2. fold the tissue paper in a concertina
 
3. tie a small piece of wire around the centre of the folded tissue paper and tie fairly tightly. (for this I used a fine beading wire that I had got from The Range.)
 
4. at this point you can use scissors to round off the edges of the folded tissue paper if you like (you could cut all types of shapes for different petal effects)
 
 
5. start to lift the tissue paper petals up and out fluffing them up as you go.  
 
6. once complete twist the wire from the flower around a headband, repeat the whole process until you have a headband fit to bursting with flowers!
 
Hope you had a good Halloweeeeeeeeeen!